 Skip to content
In this section of our Magento Tutorials we will provide you with more information on the different appearance customization options available for your Magento Application.
Even if the Magento Developers created a nice looking default Theme, that can easily be adjusted to your personal preference, you might have found another Theme that looks better for the final look of your website that you are trying to achieve. Here we will share with you more information on how you would go about changing your Magento installation’s theme.
As a start, you should review the Magento Marketplace, or another third-party vendor for a Theme that is compatible with your current Magento version and download it to your local device. We will cover the standard Theme Installation procedure in this article, however, bear in mind that some Themes might have additional steps in the configuration, therefore, always make sure to check their official Documentation that comes with the Theme Package that you have recently downloaded.
Once you have the files available on your local device, you should upload the Theme-related files to the Document Root of your Magento installation. The easiest way to do this is by uploading the files FTP (File Transfer Protocol). If you are unsure about your FTP Access Credentials, you can always contact our Technical Support Team via a Support Ticket and they will gladly provide you with them.
Once the files have been uploaded, you would need to access your Magento Admin Area Dashboard and navigate to Content (1) > Design (2) > Configuration (3) as described in the following screenshot:

Once you are there, you would need to click on the “Edit” Button Right next to the Magento Store that you wish to apply the theme on. If you have a Magento MultiStore configuration, you will see all of your available Stores in this Menu, if you have a singular Main Store you will only see the entry for it here. You can see the “Edit” button on the screenshot below:

You will be taken to a new screen, where you should be able to select your newly uploaded Theme from the “Applied Theme” (1) Drop Down menu and you should click on “Save Configuration” once you have selected your Theme:

Once you have selected your new Theme, it is possible that the changes have not immediately reflected, due to the Page Cache that Magento has by default, therefore, it is also best to clear your application Cache by navigating to System (1) > Tools (2) > Cache Management (3):

You will be taken to a new page that looks like this:
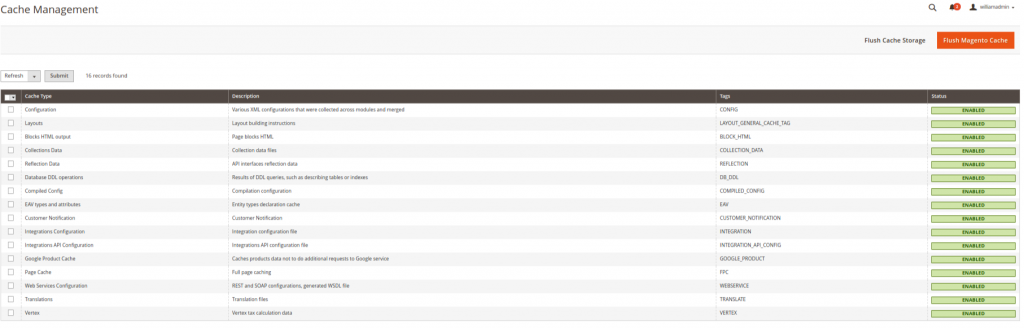
Select all Caches that are marked as “Invalidated” and click on the Refresh button from the drop down menu on the top left corner. Once the task is completed you should be able to see your new Magento Theme active on your Store.