 Skip to content
Prior to starting the eZ Publish installation, there are three main things that you should take care. First you should download the eZ Publish installation pack from the eZ Publish official website and upload it under your account;second your time zone should be applied in a custom php.ini file under your ez Publish directory and finally a MySQL database should be created for your new eZ Publish installation. This tutorial will guide you how to achieve this in some easy-to-follow steps in order to successfully complete your installation process.
1. Retrieve the eZ Publish installation pack and upload the files on your account.
You can start by downloading the installation pack via the eZ Publish official website (https://ez.no/download)
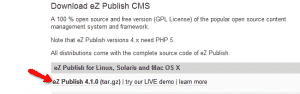
From the new page, please scroll down to the download button. No fields are required, thus, you may skip the personal information from and directly click on the download button. You will be redirected to a new page where you will be asked for the exact location to save the eZ Publish installation pack on your local computer.
As soon as you have the archive downloaded you should unzip it and open the eZ Publish directory. All files and folders under this directory should be uploaded under your account. This can be done via FTP by following our FTP tutorial.
If you are not exactly sure where to upload your eZ Publish files under your account, please note that in case you want the website to be visible at: https://yourdomain.com, the files should be uploaded your account public_html directory. This is the root visible folder of your account which can be directly accessed by typing your domain name.
In case you have an active website you should consider uploading your files under a subfolder of public_html. For example, you may create ez/ directory in your public_html/ folder and upload your files under it. In this scenario your eZ Publish CMS will be accessible via:
https://yourdomain.com/ez/
2. Apply the Time Zone for your eZ Publish application.
eZ Publish requires to manually apply the time zone for your account via a custom php.ini. This can be easily achieved by creating a simple text document on your local computer. Then open it and add the following line:
date.timezone = “US/Central”
Then use the ”Save As” option of your text editor and save the file as php.ini
When you have this file created on your local computer you should upload it to the directory where your eZ Publish files were previously uploaded. This can be done via FTP or using your cPanel -> File manager. Please note that the php.ini file should be uploaded in the exact same folder where you have previously uploaded the installation files of eZ Publish.
The full list of the supported time zones is available here.
3. Create a MySQL Database for your eZ Publish website.
To create a MySQL database for your eZ Publish CMS and add a user with all privileges to it you may follow the simple steps below or our video tutorial Create MySQL DB
Log into your CPanel (located at https://yoursite.com:2082 for your domain) Go to MySql databases
Scroll down and find: Db: _________ [add]. Here your preferred database name should be entered. Then, click Add.
This will create a database in the format of cpanelusername_databasename, where cpanelusername is your cPanel account login username with TMDhosting. Databasename is the name you have typed for your database – in this tutorial we have used ez.
Now scroll down to Users. Enter a username and password, and then click Add User.
This will create a username in the format of cpanelusername_username, where cpanelusername is your cPanel account login username with TMDhosting, and username is the one you have just created for your new database.
Please, scroll back up to locate the two drop down boxes with a button that says [Add User to Db].
In the drop-down select box on the left, choose your newly created username, and in the box on the right, choose your newly created database. Click Add User to Db.
4. Perform the eZ Publish Installation
When you have all the steps above completed, you can proceed with the installation process by accessing the folder where you have placed the eZ Publish installation files. In this tutorial we have uploaded the files under the public_html directory which means that you can access the application via https://yourdomain.com.
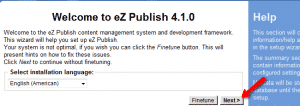
You will be directed to the welcome page of eZ Publish installer where you can select your language and click on the next button.
On the next page you are asked for the Outgoing Email settings that will be used for your application to send emails. You can either use the default Sendmail/MTA which will work without any issues or apply SMTP settings to your application by input your domain name as SMTP server name and your existing email account and password. Be advised that the username/email account should be created via your cPanel -> email accounts section.

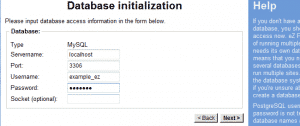
When you have the preferred configuration selected, please click on the next button. On the next page you should input the database username and password as well as the mysql port.
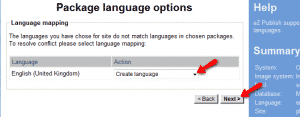
From the next page you can select the default and the additional languages that will be installed on your eZ Publish website. When you have the required languages selected, please click on the next button. On the Site Package page you can select the package on which you would like to base your application. Be advised that you can install and modify this latter via the admin panel of your application. For this tutorial we will use the plain site package. When you choose the right one for you, please click on the next button. When you have the chosen package imported you should create your language as well.
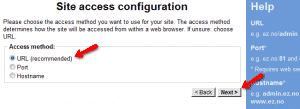
On the next page, please use the recommended settings for site access configuration and click on the next button.
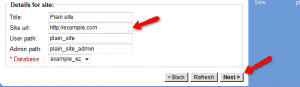
In the Site details page you can input your site URL and proceed with the installation.
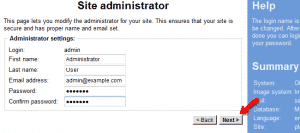
On the next page you can input the information for the administrative account which will be created for you.
On the next step you will be requested to rename the .htaccess_root file for your installation to .htaccess. This step might be skipped due to the fact that the included directives are already defined in the global php.ini and you do not need to perform this operation. Be advised that if you use the EZ Publish default .htaccess file, you will need to remove the following line: php_value allow_call_time_pass_reference 0 due to the fact that it can not be redеclared via the .htaccess file.
You may proceed by clicking on the next button on the Site registration screen which will send you an email with all the settings applied so far.
Congratulations, by clicking the next button you have successfully completed your eZ Publish tutorial.