 Skip to content
Be advised that WordPress 2.9 MU is no longer a separate project from the main WordPress branch. It is continuing development as part of the main WordPress 3 branch under the name ‘multi-site’ or MS. This means that you can get all the benefits of both WordPress and WordPress MU versions by using the latest WordPress version. To help you in the process of creating a multi-user website with the latest WordPress version we have created a detailed step by step WordPress multi-site tutorial available here.
WordPress MU is a PHP/SQL application and as such you will need to download the installation files from the official WordPress MU website and populate the database which will be used by your blog network. In this tutorial we will provide you with step by step instructions how to complete the installation process on your hosting account.
You can start by downloading the installation archive from https://mu.wordpress.org/download/. When you have the .zip or .tar.gz file downloaded you can unzip it on your local computer. The WordPress MU files should be located now under a newly created folder on your computer called wordpress-mu.
The next step is to upload the installation files under your hosting account. Be advised that in order to take advantage of all the functionality of WordPress MU we highly recommend to have your application installed under the public_html directory of your account (the root folder of your account public accessible part). This will allows your visitors to create blogs with URLs such as Username.yourdomain.com and any name *.yourdomain.com can be associated with a stand alone blog.
You can upload the content of the wordpress-mu folder from your computer to your public_html directory using your favorite FTP client by following the instructions in our great FTP tutorial.
As soon as your files are uploaded to your account, you should proceed with the MariaDB database creation process. You can easily create a MariaDB database for your blog network by using the Database Wizard in cPanel.
When all the steps are completed on your end you may access the folder where your WordPress MU has been uploaded via your browser using https://yourdomain.com/.
The following page should be displayed on your end:
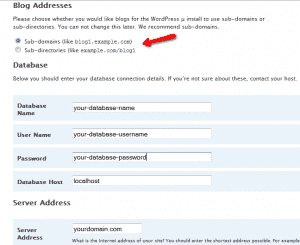
You have the following 2 options available:
Sub-domains (like blog1.example.com)
Sub-directories (like example.com/blog1)
The first one will create the blogs for your newly registered users as subdomains – for example if your visitors register the username Nickname the following subdomain will be created for him/her https://nickname.yourdomain.com and a new WordPress will be fully available for him/her.
On the other hand, the second option will handle the newly registered blogs as subfolders and the URLs will be generated as https://yourdomain.com/nickname.
If you decide to use the first option you will need to contact our Support team due to the fact that this feature requires some special server configuration to be applied for your account.
A wildcard DNS record should be created as well as a record in your domain virtual host should be applied. Please feel free to request the following settings to be applied for your account:
DNS zone modification:
* A server-ip-address
Virtual host modification:
ServerAlias *.yourdomain.com
These settings can be applied after the installation, thus, you can proceed with the installation process and submit your request latter.
On the same page of the installation you should input your MariaDB database, username and password that you have created via your cPanel -> MariaDB databases section and leave the Database Host as localhost. When you set your Site Details you can proceed with the installation by clicking on the Submit button.
This will complete the installation process of your WordPress MU and you should be redirected to the following page:

Please copy the admin password for your newly installation application – it is randomly generated for you and you can change it latter via the admin panel of your blog.
If you would like to start your WordPress MU Blog in a few clicks, check the WordPress MU Hosting package.