 Skip to content
Having a great-looking and unique Pligg community has never been easier before. Simply choose the Pligg template that you would like to have on your Pligg website and our professional tech support team will install it for free in almost no time. Any Pligg Template installation can be requested from the client’s area -> Get Support section -> Submit Support Ticket.
We will show you in this tutorial in a few simple steps how to install a new template in Pligg.
The first thing you should do is to download the distribution archive of the template you would like to install. After having your template file downloaded, please extract it to your local computer. The extracted files should be uploaded under your hosting account where Pligg is installed. If the CMS is accessible via yourdomain.com the new design files should be uploaded under the public_html/templates directory. If you have installed the CMS under a subfolder and it is accessible via yourdomain.com/cms the new design should be uploaded under the public_html/cms/templates/. This can be done via a FTP client and by following the instructions in our great ftp video tutorial.
After the upload is completed login to your Pligg administrator area:
https://yourdomain.com/admin/admin_index.php
The above will be valid if you have installed Pligg under the ‘www’ root folder of your hosting account. If you have installed it under a subfolder just add the subfolder name before the /admin/ in the URL.
The main admin page will load. Once there you could see a link on the main menu named “Templates”:
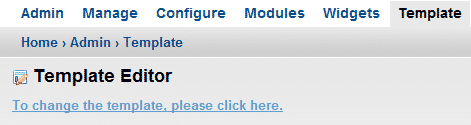
Once the page is opened you should click on the link right under the Template Editor.
You could see the design that is currently active under the section “Template”. Click on the “Value” field where the current template name is shown:
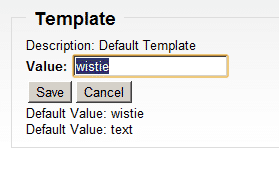
Here you should type in the exact name of the directory you have uploaded with the new template. Then just click the “save” button.
You might see a popup message showing you that the template may not be compatible with your current Pligg version. If you receive such a message review the installation instructions for details about the Pligg releases the design is compatible with. When you are sure that the template is compatible with your Pligg version you are using click “OK” on the popup box with the warning message.
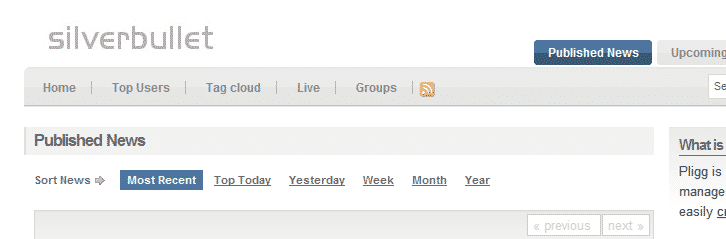
The page will refresh and you could check the front-page where the new design should be loading now:
If the template causes issues on your front-end and you cannot navigate to the admin menu in order to switch it back you could do the following:
1. Access the following URL:
https://yourdomain.com/admin/admin_config.php?page=Template
This should reflect to your website admin URL.
2. Here under the template section you could change the current theme with “wistie” .This is the default Pligg theme and by applying it you will restore your front-end access.
Note that some templates may require manual modifications on the core files of the CMS or some files to be overwritten if you are adding the design to a fresh Pligg instance. If any modifications are required on the core files it is highly recommended to download and save the original files using your FTP client. This way you should be able to re-upload these if necessary or in cases when the new template has damaged the CMS functions.